Sunday, August 29, 2010

Steampunk Paperweight

After buying the small pack of Graphic 45 Steampunk Debutante papers I knew I wanted to do something that could be called "steampunk."  Well, while rooting around and cleaning out my stash, I found a long forgotten glass paperweight.  So I decided to do a steampunk debutante in that paperweight.  And here she is:
This is the finished background to go into the paperweight itself.  I spent time searching (and cleaning out) for all the watch parts and finally found them.  I had precious few of them and so my stash of watch parts is used up with this project.  I love her hair filled with the wheels and parts from watches.
It is so very hard to take a good picture of the finished paperweight.  The rounded top of the glass picks up all reflections and you can't see the words.  But when you pick the paperweight up and move it around you can see everything inside -- and it's magnified.  The actual paperweight is just a smidge over 3 inches in diameter.  I am pleased with this piece.  First time I have been back cutting paper and gluing things down in a long time.  Been sewing most things lately!

Thursday, August 26, 2010

A rainy day

It doesn't happen often here in the Sonoran Desert.  But it is monsoon season.  The temps are high and so is the humidity.  That brings rain and thunderstorms.  I haven't seen the sun today.  Been at my craft table, busy making some small pouches or bags.  This is what I see from my window.
Actually the shutters are usually across the window but open so I can look out.  I can see a lot of movement in my peripheral vision that distracts me.  That clump of bushes you see is home to quail and bunnies.  So far today, I have seen about 6 quail run for cover from the rain in there.  And just a few minutes ago I saw a tiny baby cottontail come out of there and head for the large Texas sages bushes over here:
You can see the reflection of the open shutters in the window, but beyond that is the river rock and the big sage bushes.  Makes an interesting distraction.  I knew there were a lot of rabbits hiding in the front yard because they are regularly scared out of the bushes when I walk out there or open the garage door.  Now I know what they have been doing out there -- making more bunnies!!! (((wink, wink)))  Of course, the landscaping in the back yard is good eats, so the rabbits are doing well.  Hmm!  Perhaps if I get overrun with bunnies I will have to call someone to trap them and escort them elsewhere.

So, you ask, just what am I making today.  Here's a glimpse for you:
This simple little bag or pouch is large enough to hold a CD case or a treasure like jewelry or a small book.  I think before I put these out for sale, I am going to make a simple journal or art book to tuck inside.
This one has a gypsy girl on it.  I am working on a third right now, but waiting for glue to dry.  Took a break to do the blog.

Tuesday, August 24, 2010

The Album from Judy's workshop

The main thing we got done in Judy Wilkenfeld's workshop was construction of the entire album and getting that finished.  That took two of the three days in the workshop.  We did the cover first, then the inside pages.  While glue dried, and others caught up, we learned many techniques on how to age photos, fabric, paper, brass findings, etc.  Judy is full of ideas and techniques for putting together an album that is truly a work of art -- a family keepsake, if you wish.
On Friday, we did the album cover, start to finish.  This is the finished album cover.  We constructed it from scratch, the entire album from book board, book cloth, mull, foam, (I used) dark brown velvet, special papers and lots of glue.  Judy taught us how to age the brass findings that you see on the cover here.
We constructed the signatures (2) that went inside the book using the special papers, book cloth and book board.  The signatures were then bound to the large spine of the book using waxed linen and a simple pamphlet stitch.  Lots of space was left for the addition of pictures, fabrics, metal pieces, etc.
Here you can see the special papers from my stash that I used to cover the pages and the inside of the covers.  We aged them, scruffed the edges and did some stitching, too, to make the page look old.
Here you can see the aging of photos.  It is possible to use inks to age the photo leaving the faces highlighted.  Wonderful technique!  The edges of the photos are bound with copper tape that has been aged using Novacan.  Great stuff for aging metals.  The piece of fabric on the right was aged using walnut ink sprayed on it then quick-dried with a heat gun which melted the edges of the fabric containing the polyester fibers.

As you can see, I am not done.  I wanted to gather more items I had here at home to finish the inside pages.  You just can't take it all with you when you do a workshop.  Pity!!

Sunday, August 22, 2010

The workshop weekend

My BFF Kim and I flew to Denver together on August 12.  It sure makes the flight short when you have someone to talk to!!  Kim is a great travel buddy!  We had a good time in Colorado!

Arrival at Denver International Airport.  I have lived in Denver before, but we moved before the new airport was completed.  It sits out (way out!!) on the prairie east of the City of Denver.  Coming in to land, the grasses and fields were all green!  So pretty!  Here is the inside of the airport.
Big and bright!  The underground train system they have at DEN is fabulous and easy to use to get from terminals to the main airport.  Once Kim and I collected our baggage, we went outside to wait for the Super Shuttle to pick us up.  This is what we watched approach as we waited!
You can barely see the Rockies in the distance (the Front Range).  It did sprinkle a little bit on the Shuttle once we were on our way to Longmont.
Here are all the workshop attendees enjoying our lunch break at the Sun Rose Deli which is just a few doors down Main Street from KC's studio.  Judy and KC are on the left.  I am on the left in the turquoise shirt.  There were 8 of us attending this workshop from all over -- Vancouver BC, Houston, San Diego, and, of course, Arizona.

This Sun Rose Deli is in a restored building.  Note the brick walls and now check out the tin ceiling and sky light in the deli.
There is plenty of art work from local artists to enjoy and purchase at the deli.  We all ate there twice during the three day workshop.
Here's Judy and our hostess, KC for a photo op!  This is inside KC's gallery and studio.
I have to share this last photo.  If I could have jumped out of the Super Shuttle and taken more pictures I would have.  This was taken at the home of the last person we picked up before heading back to DEN airport.  We drove to the rear of the property to pick up the passenger.  In an old barn back there was a really old hearse -- you could see the back end of it sticking out of the barn.  This great old wagon was in the yard in front of the barn.  There was also an old sulky sitting out in the same area.  Would have loved to explore this place!!  But we were heading home.

Saturday, August 21, 2010

Flowers and rayon seam binding

Just wanted to share a couple of things with you today.  Coffee dyed and walnut inked flowers and how to crinkle up rayon seam binding.

First of all, here are the flowers. 
The one on the left is the original flower shape and color.  I took these flowers off of an old basket purse found at a yard sale several years ago.  After spending last weekend with Judy Wilkenfeld and KC Willis (fab weekend -- more on that later!), I am back into coffee dyeing and using walnut ink to dye things.  The middle flower is coffee dyed.  The flower on the right was wet with coffee and then I sprayed walnut ink onto it before it dried.
Each petal set was separated and placed on a plate to air dry.  You can see the uneven dyeing effect on the flowers.  Some petals have off white tips and other petals have dark tips.  I love the effect!  I plan to use them to make pretty pins or to decorate upcoming projects.

Next up is crinkled rayon ribbon.  I love the look but really didn't know the "secret" for getting the ribbon crinkled.  I tried ironing it, but didn't like the pressed look.  While at Art Unraveled two weeks ago, I met Lesley Venable (whom I liked immediately!) and quizzed her on how she crinkled her rayon ribbons.  She was gracious enough to share that with me.
These are from vintage rolls of rayon seam binding or ribbon.  I love the softness of the old rayon binding.  I crinkled these by spritzing them with water, scrunching them up, squeezing them and twisting them tight.  Then I packed each piece in a plastic baggie, squeezing out the extra air and rolling the bag and left them overnight.  The next day I unwrapped the ribbons, and fluffed them on a plate to continue to air dry.  And the crinkles are great!

Got to show you the white rayon seam binding up close.  It started out white.  But I saw my empty coffee pot sitting on the counter with just a little (really little!) bit of coffee left in it.  So I took the damp white ribbon and wiped the coffee pot clean inside and proceeded with the above instructions.  Look at what happened on the edges of the ribbon!
It looks really old!  I was so happy with this happy experiment!  Am going to do more!

Wednesday, August 18, 2010

This is the last little journal for now.

I think she truly looks like a "femme fatale".

I will be uploading the three journals today on my Etsy Shop, Vintage Recycled.

Saturday, August 14, 2010

Easy peasy, lemon squeezy project

That's what my grandchildren say when they finish something that was really easy.  Love it!

Here's an idea for you that is "easy peasy, lemon squeezy" and I have my BFF Joy to thank for it.  Stamped guest towels for the guest bathroom.
I am going to give these as gifts as well as sell them in my booth at Merchant's.  You can make guest towels for your bath, too.  Buy a package of inexpensive plain paper guest towels at Bed, Bath and Beyond.  I found three colors there:  white, gray and tan.  Take your favorite stamp and using Staz-On ink in a coordinating color with your bath, stamp the image on one side.  Done!  I did practice on one towel to be sure I was inking properly.  I also opened the center fold of the towel before stamping.  That way it's not as spongy when you stamp on a hard surface.  Easy, right?!

My friend, Joy, has stamped guest towels in her truly western style bathroom.  And she has them placed in a wood stirrup as a holder.  That's where I got the idea!  And I am doing the same thing in my guest bath.
So these will be ready for my bridge group the next time we play at my house!  Thanks, Joy!!!

Wednesday, August 11, 2010

Keepsake Album with Ruth Rae

What a lovely person and teacher Ruth Rae is!  I really am glad I met her and was able to take her Keepsake Album class at Art Unraveled 2010.  I didn't get finished in class.  But will finish the album next week.  Here are a couple of the collages I did in class:
Love the mica pieces as the burned edges of the organza.  Didn't know you could sew on mica.
Lots of pockets for memorabilia.  A pretty pin on lace.
I learned about a pour on resin that made that music paper transparent and like glassine.  Can't wait to do more of that.  This is my mom, by the way, at age 17.  I made 6 small collages that will be sewn onto the felt pages of the book and then bound.  Will show you once it is finished.

This is another of the little journals that I finished last week.  She will be in my Etsy shop in a week or so.

Sunday, August 8, 2010

Weekend went so fast!

Yesterday I met my BFF Kim at Art Unraveled 2010 in Phoenix.  It was the Shopping Extravaganza.  We toured the vendors and exhibitors, bought a few items, chatted with artsy friends (Jack & Cat, Josie, Tricia, Artsy Fartsy Fairy) and met a new friend, Lesley Venable.  We then went to lunch at Olive Garden.  Today Kim is taking a class at AU.  Tomorrow I am taking a class from Ruth Rae.  Met Ruth at the vendor fair.

Been working on a few more small journals.  This time with a different theme.  Will put these in my Etsy Shop after I return from the trip to Colorado for the Judy Wilkenfeld workshop at KC's studio in Longmont.  Really looking forward to that!
This one I call "Cherchez la femme" and I love the softness of it and feminine touches.  Turned out nice.  The image is from Everything Vintage which was formerly Tallulah's.  Check it out!  Really lovely images!

Thursday, August 5, 2010

Know what drives me crazy?

Putting something down somewhere in this house and then spending a lot of time looking for it just a few minutes later!  That was yesterday!  It was a small tag for a new journal I am doing as well as the embroidery needle to add a few french knots to it.  I finally found the tag on the floor in the closet where I was looking for the needle.  Haven't found the needle yet!  Not good!!

Today I looked all over for a silver bracelet I know is here.  I just cleaned it.  Do you think I can find it??  It will show up, but not right now. I quit looking so I could do a few blogs.  It'll turn up!

Today I want to share with you some things I love that don't drive me crazy -- in my house as well as in a favorite store.

One of my favorite places to visit in Virginia is the Old Lucketts Store in Lucketts, Virginia, a small burg several miles north of Leesburg on Hwy. 15 (a treacherous piece of road, I might add!).  I get emails when they are going to open their Design House.  They are having a big Open House this weekend.
Design House photo
Old Lucketts Store, Lucketts, VA
I just want to sit down and read!  Also featured was this:
Design House photo
Old Lucketts Store, Lucketts, VA
I love turquoise jewelry.  I have some, but I discovered I have more silver bracelets than those with turquoise. 
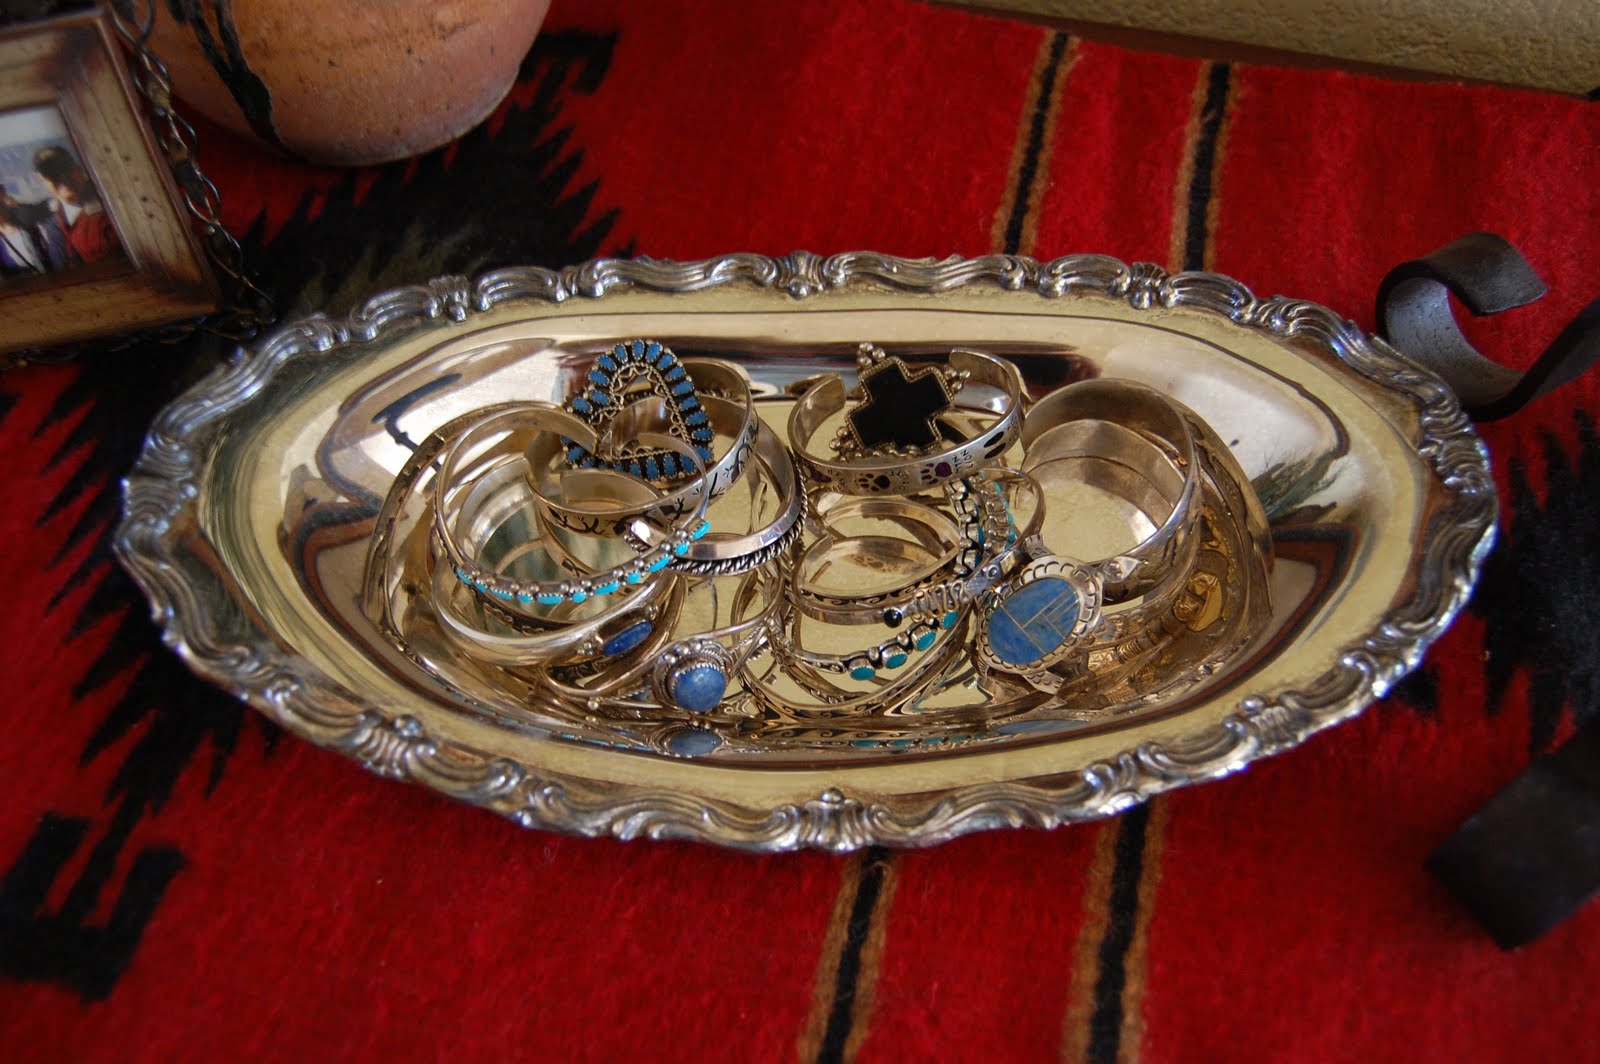
I also recently saw a picture of Mary Emmerling with a lot of Indian bracelets on both arms as well as a silver dish full of them.  So, in keeping with the picture I saw, I dug out my only silver tray, polished it and added my silver Indian jewelry.  I spent a few minutes looking through the magazines for that picture.  Now, please refer to paragraph 2 above!
Design House photo
Old Lucketts Store, Lucketts, VA
I love these santos.  It took me over a year to acquire the two I have.  Finding them is not easy.  And when you do, they are not cheap.  But, yesterday I found an ad in the latest issue of Somerset Home for Santos Dolls Angels Busts Art here.  Well, where were they when I began looking for these 2+ years ago?
These are my santos draped in rosaries (which I collect) and jewelry.  The angel on the top is in the great room.  The santo just above is in my bedroom.  I made her pointy hat!  Just the right touch!

Last is my entryway niche.  It used to hold a huge flower arrangement which I never liked -- but the decorator did.  Now it is to my liking.
Thanks for visiting.  Hope you enjoyed the pics of the Design House at the Old Lucketts Store as well as a peek into my my house for a look at some of my favorite things.

Sunday, August 1, 2010

Aren't these pretty?

Wish these were in my yard!  But they are in a friend's yard in Bethesda, Maryland.  Just glad I got to see these during my visit last week.
Pink cone flowers (Echinacea) and a swallowtail butterfly.

Saturday, July 31, 2010

Did you know I was out of town?

I scheduled posts throughout the last week because I had been to Virginia for more birthday celebrations -- my granddaughter and my son.  Had a great visit, but must say the weather was no better out there than it is here in Arizona.  Hot and humid!
Here's the birthday girl, Kara.  She turned 6 on July 22.
We went to DC on July 23.  Always good to see the Washington Monument.  Look at the traffic and tourists!  An organized march was about to begin.  And the Boy Scouts were there celebrating their 100th birthday!  Go Scouts!!!  They will be there until the end of next week.

We went to DC to visit the National Aquarium.  The kids enjoyed seeing all the exhibits there.  Must say, however, that it doesn't hold a candle to the Monterrey Bay Aquarium.  We then walked to the Old Post Office for lunch and a tour of the Tower in the Old Post Office.
Here's a view from the tower.
Beautiful!

Thursday, July 29, 2010

An upcoming workshop

Last year I had read and heard about a workshop that Dede Warren was hosting by mixed media artist, Judy Wilkenfeld.  After reading about the wonderful workshop and seeing pictures of Judy's book as well as some of the artwork by those who took the class, I was upset with myself for not going.  Dede had encouraged me to take it but I didn't.  Various reasons.  Not important now.  Put it on the "bucket list."

So, when I discovered that Judy was coming to teach in the USA again, I decided I would go if she was anywhere close.  Then I found out that KC Willis is hosting Judy's workshop in August at her studio!  Could I be any more excited about that??  Judy Wilkenfeld at KC's studio?!!!  Well, I signed up and will be heading to Colorado in mid-August to take the workshop.  Here is a glimpse of the piece Judy sent to KC as a class sample.
"Just in Case"
Artwork  and photo by Judy Wilkenfeld
I can't wait to learn the techniques for creating a book as wonderful as this!  I have already spent time gathering the class supplies, still have more to do.  More metal, more pictures, more doodads.

I think there are still a few openings in this workshop.  More information can be found here.

Tuesday, July 27, 2010

I love old books

I love it when I happen upon an old book with a really nice cover.  I found two such books during my weekend in Payson.

The first one is here:
This one is a German novel printed in a old font that I can't decipher.  It was published in 1923.  There are several lovely color plates in this book.  I love the cover with the mottled green background and the white daffodils (I think!).  I added the green ribbon and the inked tag with the gold bell.
An old book for a little boy's library.  The little child on the cover in the red snow suit who is sledding down the hill caught my attention.  Especially the cute face.  This book was published in 1893.  A really old book that is in really good shape.  Good find!

Usually when I find books with nice covers, the inside is damaged or the cover is falling off.  Those are the ones I save for altered book projects.  I have a few set aside, but haven't started any projects lately.

Saturday, July 24, 2010

Recycled bottles and vintage pearls

I have been collecting broken pearl necklaces for quite some time.  Little by little I have filled up several small bottles with the pearls.  They sat for some time on my shelf (would you believe over a year??) and I often wondered just how decorate them.  Here are the results:
This bottle came with the rusty ring on the neck.  It's what's left of the screw off cap.  So I found a glass stopper that fit, filled the bottle with a broken pearl necklace, glued the stopper in and decorated the front of the bottle.  It is an old pearl earring glued onto a bit of lace with tiny seed pearls and then a small dangle attached.
This small bottle has an old earring for a stopper, a bit of a lace doily with the top of a broken locket glued on it.  Small coffee-dyed lace is wrapped around the neck and tied in a box.

Recycling at its best!  And I am slowly cleaning out bits of my stash.

Wednesday, July 21, 2010

Spice shakers redeux

There were four of these spice shakers in the thrift store two weeks ago.  I had my "thinking outside the box" hat on that day and bought them.  I cleaned them up and then went to work on them.
I filled each one from my stash of small pearly buttons, wrapped these two in old lace and tulle, stamped clear round tags and tied them on.  A lot of people buy buttons from me.  Don't know exactly why -- do they collect, do they sew, do they do mixed media art???  Anyway, what better way to display a jar of tiny pearly buttons in your sewing room or to give as a gift for someone else.
These two are again wrapped with pieces of vintage lace and the tags are antiqued and then an old white rose bead is attached.  Way pretty, don't you think??

Once the buttons are used up, the shaker can hold glass glitter, regular glitter, or more buttons for your crafting.

Sunday, July 18, 2010

Dolling up ordinary finds

For my booth in Merchant Square, I like to doll up ordinary finds and make them extraordinary.  Here are some examples:
The tall glass dome and base were a find a few months ago.  It originally was dirty glass on a wood base.  I cleaned it up, painted the base and added a clear knob with a pearl in top.  That way it can easily be lifted off without fingerprints in order to change the display inside.  It is now a cloche for displaying your favorite items.
This bottle is an old Fletcher's Castoria bottle -- remember that awful stuff??  My mom had that in the medicine cabinet (this is not my mom's bottle).  It tasted awful!!  I digress!!  I covered the bottle with pretty lace and embellished it with old earrings, some satin roses in my favorite colors and a pretty vintage pink ribbon necktie.
Looks great in the dome, don't you think????
Next up is this single glove I found in a pile of fabrics.  I had long ago seen Beth Quinn decorate a glove -- in fact, I think I saw it at Art Unraveled last year.  Anyway, I decided to decorate up this pretty glove and make it a piece to either hang or display in your favorite room!  It has an old lacey hankie coming out of the top, a bit of old lace with a ribbon rose and a sparkly button glued on.  Perfect touch!

These will be in my booth at Merchant Square by Tuesday of this week.  This coming weekend is another fabulous 3-day sale at Merchants.  Don't miss it!  We have a lot of wonderful dealers in there with lots of goodies for your home, art work, favorite collectables, or crafts.